
Вы один из тех разработчиков, которые создают сценарии, чтобы сделать свою жизнь проще? по совпадению, тебе нравится Python? а у тебя винда ?. Вместо того чтобы постоянно работать с консолью, выполняющим сценарии вручную в консоли, вам необходимо знать, что существует простой способ их выполнения и даже создание небольших консольных приложений с ними в Windows. Мы говорим о создании .exe (да, файлы приложений) файлы со скриптами Python, благодаря pyinstaller. PyInstaller — это программа, которая замораживает (упаковывает) программы Python в автономные исполняемые файлы под Windows, Linux, Mac OS X, FreeBSD, Solaris и AIX.
В этой статье вы узнаете, как легко создать исполняемый файл из консольного скрипта Python, используя Pyinstaller в Windows.
Требования
Для создания нашего исполняемого файла мы будем использовать пакет pyinstaller. Чтобы загрузить pyinstaller, выполните в командной строке следующую команду (cmd.exe):
pip install pyinstaller
Установка продолжится, и у вас будет доступный pyinstaller в вашей среде:
How to turn your Python file (.py) into an .exe (Tutorial 2021)
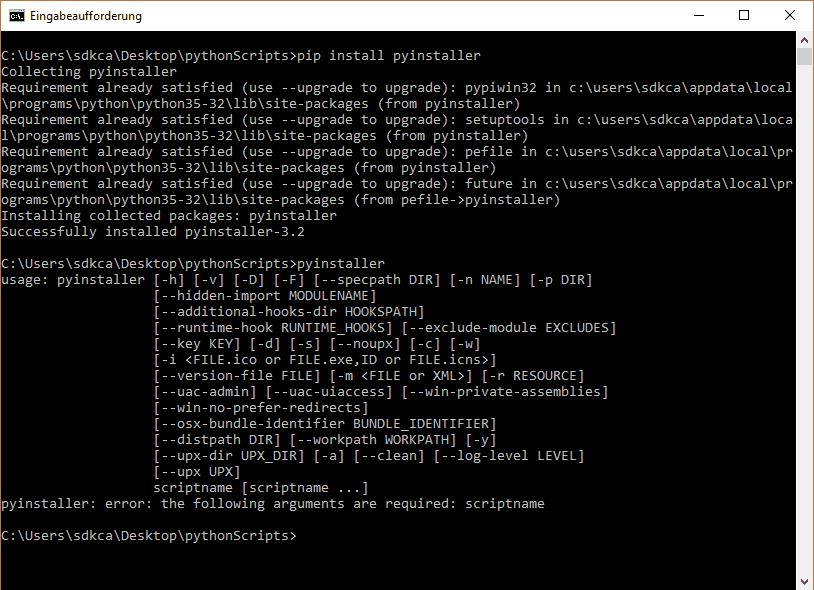
Вы можете прочитать больше об этом пакет на официальном сайте. Чтобы проверить, правильно ли установлен pyinstaller, вы можете проверить, доступен ли он в консоли как переменная среды, выполняющаяся pyinstaller —h ,
Реализация
Создание исполняемого файла с использованием pyinstaller очень простое, настраиваемое и очень простое в использовании. В нашем примере мы собираемся создать исполняемый файл следующего скрипта. Имя файла сценария file-creator.py и содержит следующий код (он просто запрашивает у пользователя имя нового файла и содержимое):
def start_setup(): # raw_input returns the empty string for «enter» yes = set([‘yes’,’y’, ‘ye’, »]) no = set([‘no’,’n’]) prompt = ‘> ‘ print («Hi, welcome to Text File Creator 2000») print («To get started, give a name to your file (without extension)») filename = input(prompt) print («Awesome, now provide the content of the file !)») content = input(prompt) confirm = input(«> Do you want to continue with the creation of » + filename + «.txt ? (Yes/No)»).lower() if confirm in yes: text_file = open(filename + «.txt», «w») text_file.write(content) text_file.close() print («File succesfully created, come back soon !») return True elif confirm in no: print («Ok, nothing will happen !») return False else: print («Please answer yes or no !, the setup will start again») # start again start_setup() start_setup()
Как видите, это простое консольное Python-приложение. Теперь, чтобы создать исполняемый файл, перейдите с помощью консоли (cmd.exe) в папку, где расположен скрипт python (в данном случае Desktop pythonScripts):
cd C:UserssdkcaDesktoppythonScripts
Теперь приступим к созданию исполняемого файла, используя следующую команду:
Уроки Python / Как в PyCharm создать EXE файл
pyinstaller file-creator.py
Это самая простая команда для создания исполняемого файла вашего скрипта, поэтому этого должно быть достаточно для создания исполняемого файла в папке, где расположен скрипт. Обратите внимание, что наше приложение основано только на консоли (если вам нужен исполняемый файл с манифестом в той же папке и другими зависимостями, вы можете добавить в команду параметр —console, если вы используете GUI с библиотеками, такими как wxPython, тогда вместо этого из —console использование параметра —windowed .).
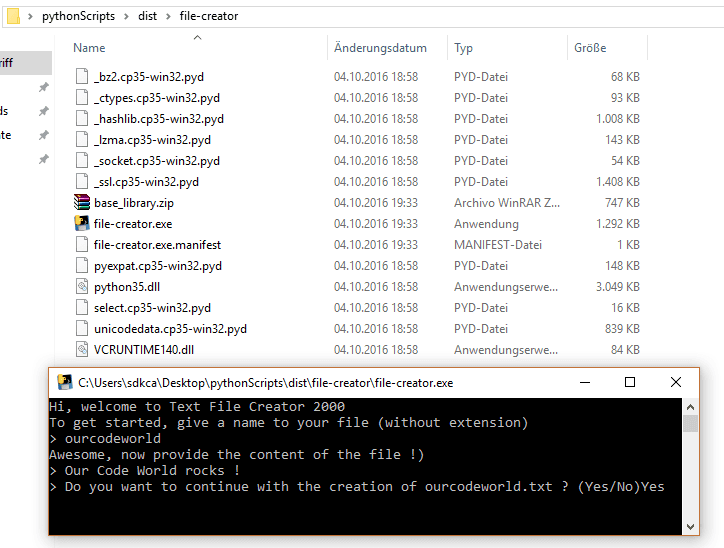
Наконец, вы можете протестировать созданный исполняемый файл в папке dist, которая будет создана там, где находится скрипт:
Советы и предложения
- Вы можете изменить значок вашего исполняемого файла, добавив параметр icon (с путем к файлу в качестве значения) в команду (pyinstaller) script.py —icon=c:path-toicon.ico ).
- Существуют различные области типичных проблем, которые могут возникнуть при использовании PyInstaller. Для устранения проблем в вашем приложении, пожалуйста, обратитесь к «если что-то идет не так, readme» в хранилище здесь.
Источник: helpexe.ru
Tutorial
Two directories will be created when you run your setup script, build and dist. The build directory is used as working space while your application is being packaged. It is safe to delete the build directory after your setup script has finished running. The files in the dist directory are the ones needed to run your application.
4. Test your executable
Now that the package has been created it is ready to test:
C:Tutorial>cd dist C:Tutorialdist>hello.exe Hello World
Excellent, it works.
5. Providing the Microsoft Visual C runtime DLL
The Python interpreter was compiled using Microsoft Visual C, so your new program needs the Microsoft Visual C runtime DLL to run. If you have installed appropriate versions of Python or Visual Studio, then you will already have this DLL on your computer. If some of your users might not already have this DLL, then they will not be able to run your program. The methods you may use to solve this depend on the version of Python you are using:
5.1. Python 2.4 or 2.5
If you are using Python 2.4 or 2.5, then the DLL you need is called MSVCR71.dll. This DLL will probably already have been included in your dist directory, in which case you need do nothing more.
However, the copyright on this file is owned by Microsoft, and you need to check whether you have the legal right to redistribute it. If you have a copy of Visual Studio, check the file redist.txt provided within the installation to see whether you have redistribution rights for this DLL. Generally you have the right to redistribute it if you own a license for Microsoft Visual C++, but not if you use the Express Editions.
If you do not have the rights to redistribute MSVCR71.dll, then your users must install it for themselves, using the Microsoft Visual C++ 2005 Redistributable Package (vcredist_x86.exe).
Either you can instruct your users to download and run this themselves, or you could create an installer for your application (see Step 6 below), that includes vcredist_x86.exe (which is itself redistributable by anyone), and then run that as part of your application installation.
5.2. Python 2.6, 2.7, 3.0, 3.1
For Python 2.6, the DLL you need is called MSVCR90.dll. Py2exe is not able to automatically include this DLL in your dist directory, so you must provide it yourself.
To complicate things, there is more than one version of this DLL in existance, each with the same filename. You need the same version that the Python interpreter was compiled with, which is version 9.0.21022.8. Through the remainder of these instructions, hover your mouse over the dll file (or the vcredist_x86.exe installer executable) to confirm which version you’ve got. You’ll need the vcredist_x86.exe that contains the Microsoft Visual C++ 2008 Redistributable Package published 29-11-2007, so not the VS2008 SP1 one (tested with Python 2.7.1).
As for older versions of Python, you need to check redist.txt within your Visual Studio installation to see whether you have the legal right to redistribute this DLL. If you do have these rights, then you have the option to bundle the C runtime DLL with you application. If you don’t have the rights, then you must have your users run the redistributable C runtime installer on their machines.
5.2.1. Bundling the C runtime DLL
- «For your convenience, we have provided the following folders for use when redistributing VC++ runtime files. Subject to the license terms for the software, you may redistribute the folder (unmodified) in the application local folder as a sub-folder with no change to the folder name. You may also redistribute all the files (*.dll and *.manifest) within a folder, listed below the folder for your convenience, as an entire set.»
You must make py2exe copy the three dlls and the manifest file into your project’s dist directory, in a subdirectory called ‘Microsoft.VC90.CRT’. To achieve this, add a data_files option to your project’s setup.py:
from glob import glob data_files = [(«Microsoft.VC90.CRT», glob(r’C:Program FilesMicrosoft Visual Studio 9.0VCredistx86Microsoft.VC90.CRT*.*’))] setup( data_files=data_files, etc )
With this in place, running py2exe should put the files into your dist directory:
dist | +-Microsoft.VC90.CRT | | | +-Microsoft.VC90.CRT.manifest | +-msvcm90.dll | +-msvcp90.dll | +-msvcr90.dll | |-etc
Now, simply copying the whole dist directory to your users machines should now allow your application to run, even on machines that don’t have their own copy of the C++ runtime.
Note that this method of including the C runtime is used by several Visual C++ applications — if you search your Program Files folder for msvcr90.dll, you may find several applications that have this DLL and the associated manifest bundled alongside their executable like this.
Also note that despite all the above, py2exe will complain that it cannot find MSVCP90.dll. You must edit your setup.py to add the path to the dlls to the sys.path, e.g.
sys.path.append(«C:\Program Files\Microsoft Visual Studio 9.0\VC\redist\x86\Microsoft.VC90.CRT»)
5.2.1.1 win32ui special case
win32ui needs MFC DLLs to run .exe, see Py2exeAndWin32ui for extra informations
5.2.2. Running the redistributable C runtime installer
If you don’t have rights to redistribute MSVCR90.dll, then your users may install it on their machine by running the Microsoft Visual C++ 2008 Redistributable Package (vcredist_x86.exe). It is important not to use the SP1 version of this installer, which contains the wrong version of MSVCR90.dll.
Either you can instruct your users to download and run this themselves, or you could create an installer for your application (see step 6 below), that includes vcredist_x86.exe (which is itself redistributable by anyone), and then run that as part of your application installation.
The installer puts a copy of the DLLs in the directory C:WINDOWSWinSxS (XP), inside subdirectories with mangled names. The manifest file is in the ‘Manifests’ subdirectory, again this will have a mangled filename. You can still discern the text ‘Microsoft.VC90.CRT’ and ‘9.0.21022.8’ within the mangled file and directory names, to find the files. It is possible to take a copy of these files and remove the filename mangling, to embed them in your application as described in 5.2.1.
6. Build an installer if applicable
py2exe is not an installer builder — it merely assembles the files needed to run your Python program. There are plenty of good installer builders out there including some that are open source (e.g., NSIS) and some that are free (e.g., Inno Setup).
Tutorial (последним исправлял пользователь JimmyRetzlaff 2020-06-17 15:15:20)
- Неизменяемая страница
- Комментарии
- Информация
- Прикреплённые файлы
- MoinMoin Powered
- Python Powered
- GPL licensed
- Valid HTML 4.01
Источник: py2exe.org
Python exe packer — программа для сборки скриптов Python в exe файлы 2.0
![]()
Простой графический интерфейс для преобразования скриптов Python в .exe программы на основе Pyinstaller и Tkinter.
Открытый и хорошо задокументированный код позволит легко добавить новый функционал по вашему усмотрению.
Так же необходимо установить библиотеку PyInstaller и pypiwin32
Автор Кирилл Скачивания 1,518 Просмотры 3,035 Первый выпуск 19 Дек 2019 Обновление 13 Мар 2021 Оценка 0.00 звёзд 0 оценок
Источник: www.safezone.cc