
Компьютер: Intel Xeon i7 6700 (ядро) + Intel HD Graphics 530 (skyLake) + Linux (CentOS 7.2 или 7.3, мой 7.3) + eclipse (Neon) Установите среду OpenCL, надеюсь установить Intel i7 6700 в качестве хоста, HD Graphics 530 — это используется как устройство.
Спустя долгое время я понял, что HD Graphics 530 не имеет драйвера под Linux, https://downloadcenter.intel.com/product/88345/Intel-HD-Graphics-530 Официальный сайт дает все это под Windows. Так что драйвер сохраняет этот шаг.
Следуйте: https://software.intel.com/en-us/articles/sdk-for-opencl-gsg для установки.
1. Установите драйвер Intel OpenCL.
На официальном веб-сайте есть сценарий для прямой установки: https://software.intel.com/sites/default/files/managed/f6/77/install_OCL_driver.sh_.txt Я использовал для создания нового текстового файла и копирования этого сценария. В результате при установке всегда возникают ошибки и их невозможно скопировать! Скачать напрямую. Я поместил его на http://download.csdn.net/download/wd1603926823/10219725, и его можно скачать напрямую. После завершения загрузки следуйте инструкциям на официальном сайте, чтобы начать установку:
Вебинар «Вычисляем на видеокартах. Технология OpenCL»
$ mv install_OCL_driver.sh_.txt install_OCL_driver.sh $ chmod 755 install_OCL_driver.sh $ sudo su $ ./install_OCL_driver.sh install
Всегда выбирайте y, который равен «Да», а затем появляется:

Затем появляется ошибка: Поскольку у меня ядро Linux 3.10.0-514.el7.X86_64, я получаю сообщение об ошибке. Условия установки не выполняются.

Когда появилось это приглашение, я подтвердил, что у меня достаточно места на диске, поэтому я снова запустил установку, и на этот раз ошибок не было. Долгое ожидание —- установка завершена.

Затем я последовал предложению 1, чтобы добавить пользователя root в группу видео. Если второй пункт не устраивает, просто проигнорируйте его и перезапустите.
Вы также можете самостоятельно открыть запрошенную страницу, чтобы вручную загрузить linux-4.7.tar.xz, а затем закончить чтение https://linoxide.com/linux-how-to/upgrade-linux-kernel-stable-4-7-centos- 7 Будет установлена последняя часть -x /.
Два, Intel_OpenCL_SDK
https://software.intel.com/en-us/articles/sdk-for-opencl-gsg Приведенные здесь данные предназначены для Ubuntu, а не для CentOS. Но я все еще хочу попробовать, поэтому я загрузил это (не копируйте, а загрузите напрямую), а затем запустил его следующим образом:
$ mv install_SDK_prereq_ubuntu.sh_.txt install_SDK_prereq_ubuntu.sh $ sudo su $ ./install_SDK_prereq_ubuntu.sh

Итак, SDK установлен.
После установки вы увидите, что в / opt / instel / есть 4 файла (папки): ism opencl opencl-sdk и еще один файл. Откройте папку opencl-sdk, и вы увидите папки include и lib64. . . Это должен быть настоящий успех.
Как скачать opencl.dll и исправить ошибки при запуске игр и программ
В-третьих, проверьте, поддерживает ли устройство OpenCL.
Но ввод Clinfo сказал, что разрешений недостаточно, поэтому я вручную загрузил rpm-пакет Clinfo, а затем: rpm -ivh Clinfo-2.1.17.02.09-1.el7.x86_64.rpm Установка прошла успешно. Затем введите Clinfo: хахаха наконец появилось 2 платформы и 2 устройства хахаха! ! ! ! !
Платформа 1: Intel (R) OpenCL (устройства: Intel (R) HD Graphics и Intel (R) Core (TM) i7-6700 CPU);
Платформа 2: экспериментальная платформа OpenCL 2.1, предназначенная только для ЦП (устройство: процессор Intel (R) Core (TM) i7-6700);
Так счастлив! ! ! ! Настроен Intel Core Display для среды OpenCL под Linux! ! !
В-четвертых, используйте eclipse для создания теста проекта OpenCL.
Добавьте / opt / intel / opencl-sdk / include и . / lib64 в соответствующее место! ! !
Пять, образцы Intel opencl
Вы можете взглянуть на https://software.intel.com/en-us/intel-opencl-support/code-samples и https://software.intel.com/en-us/articles/getting-the- most-from -opencl-12-how-to-growth-performance-by-minimizing-buffer-copy-on-intel-processor-graphics Потому что я боюсь, что исходная передача 0 будет записана как передача из памяти в память Тогда нет смысла использовать ядерный дисплей. . .
https://software.intel.com/en-us/forums/opencl/topic/708049
Шесть, инструмент отладки Intel и просмотра производительности для Linux
Я видел Amplifier XE на официальном сайте, который взимает плату, а позже узнал, что есть Intel VTune Performance Analyzer. Я загрузил этот инструмент по адресу http://download.csdn.net/download/morre/8557459. Также есть ссылка для скачивания здесь: http: / /intel.brothersoft.com/intel-vtune-performance-analyzer-for-linux.html?fromsearch.
Дополнительно: http://qcd.phys.cmu.edu/QCDcluster/intel/VTLRELEASENOTES.htm Также существуют различные сравнения различных версий. http://blog.csdn.net/yangsc1984/article/details/3908823 Вот чье-то введение на китайском языке. https://www.viva64.com/en/t/0091/ Вот чье-то введение на английском языке. Http://blog.csdn.net/honey_yyang/article/details/7848923 Это введение в мощные функции в сочетании с eclipse. https://software.intel.com/en-us/code-builder-user-manual-installing-opencl-kernel-debugger-for-linux Инструмент отладки, упомянутый в официальном сайт здесь в sdk?
Http://opencl38.rssing.com/chan-13188063/all_p8.html Это проблема, с которой сталкиваются другие при отладке на форуме. Распаковать и подготовиться к установке, а там написано, что нужен серийный номер? ! ! ! ! У меня нет серийного номера, и на официальном сайте Intel его больше нет. Анализатор производительности Intel VTune? ! ! ! ! ! Теперь единственными инструментами для Linux на официальном сайте являются: https://software.intel.com/en-us/intel-devtools-by-os/linux Только эти. Без серийного номера вы не сможете установить бесплатный инструмент opencl, поэтому вы можете установить только этот https://software.intel.com/en-us/intel-vtune-amplifier-xe 30, следуйте https://software.intel .com / en-us / vtune-amp-install-guide-linux-user-interface-install для установки.
7. Сравнение примера с предыдущими AMD
При использовании ранее видеокарты AMD 560: версия процессора занимает около 19 секунд, версия OpenCL занимает около 4,5 секунд (однопоточная и многопоточная версии одинаковы)
Теперь с использованием дисплея ядра Intel Skylake: версия процессора занимает около 17,3 с, однопоточная версия OpenCL занимает около 5 с, а многопоточная версия OpenCL на самом деле занимает 38 с? ! (Должна возникнуть проблема при изменении версии OpenCL с однопоточной на многопоточную)
Источник: russianblogs.com
intel-opencl-rt 2023.0.0
This COMPILER-SPECIFIC Intel® oneAPI OpenCL* Runtime package contains the compiler-specific shared libraries needed to deploy executables to hosts without the Intel®oneAPI development Toolkit. In addition to this package you will need both the COMMON LIBRARIES and COMMON LICENSING packages.
Подробности проекта
Ссылки проекта
Статистика
Метаданные
Лицензия: Other/Proprietary License (Intel End User License Agreement for Developer Tools)
Источник: pypi.org
Как установить libOpenCL.so в Ubuntu
Я скачал intel_sdk_for_opencl_2016_ubuntu_6.0.0.1049_x64 , попытался запустить install.sh , но там написано «Неподдерживаемая ОС», поэтому я где-то прочитал, что мне нужно сделать файл .deb из одного из файлов RPM, я сделал это с помощью 2:
Установил их обоих с помощью sudo dpkg -i , но у меня все еще нет необходимого libOpenCL.so
Теперь я застрял . (
задан edwinksl 12 July 2016 в 15:48
4 ответа
Это похоже libOpenCL.so , обеспечивается ocl-icd-opencl-dev пакет. Для установки этого пакета работайте:
sudo apt update sudo apt install ocl-icd-opencl-dev
Теперь libOpenCL.so должен быть расположен в /usr/lib/x86_64-linux-gnu/libOpenCL.so
ответ дан Nick Weinberg 12 July 2016 в 15:48
Путь, предложенный Nick Weinberg, устанавливает довольно устаревшую версию драйвера, поэтому я предложил бы загрузить тот непосредственно с Вашего поставщика оборудования.
Так как у Вас есть Intel CPU, сделайте следующее
- Откройте веб-страницу драйверов Intel OpenCL, перейдите к «Intel CPU Runtime для Приложений OpenCL™ 18.1 для Linux* ОС (только 64 бита)» и нажмите «Download»
- Веб-сайт попросит, чтобы Вы зарегистрировались и вошли в систему. Это обязательно. Затем Вы будете направлены к ссылке с tgz-архивом.
- Загрузите этот архив и установите его следующим образом.
tar -pvxf l_opencl_p_18.1.0.013.tgz cd l_opencl_p_18.1.0.013/` sudo ./install.sh`
Мое понимание предмета — то, что вышеупомянутые шаги позволяют OpenCL получать доступ к Вашему Intel CPU. Но если у Вас есть Intel HD Graphics, имеет смысл позволять OpenCL использовать эту интегрированную графику также. Затем сделайте следующее
- Откройте веб-страницу драйверов Intel OpenCL снова, но на этот раз перейдите к «Linux* ОС Ubuntu* 16.04.x (deb)» под разделом «Intel® Graphics Technology». Затем у Вас есть два варианта: «Загрузите» и «Сборка». Используйте ссылку «Загрузки», она принесет Вам к предварительно созданным двоичным файлам («Сборка» принесет Вам к исходному коду в GitHub Intel, но я никогда не пытался скомпилировать ее из источника).
- Следуйте инструкциям, данным там. Я только что скопировал их здесь с, каждый фиксирует — использование sudo apt вместо sudo dpkg -i *.deb с тех пор dpkg не проверяет зависимости:
mkdir neo cd neo wget https://github.com/intel/compute-runtime/releases/download/19.14.12751/intel-gmmlib_19.1.1_amd64.deb wget https://github.com/intel/compute-runtime/releases/download/19.14.12751/intel-igc-core_19.11.1622_amd64.deb wget https://github.com/intel/compute-runtime/releases/download/19.14.12751/intel-igc-opencl_19.11.1622_amd64.deb wget https://github.com/intel/compute-runtime/releases/download/19.14.12751/intel-opencl_19.14.12751_amd64.deb wget https://github.com/intel/compute-runtime/releases/download/19.14.12751/intel-ocloc_19.14.12751_amd64.deb sudo apt install ./*deb
P.S. веб-сайт Intel перечисляет подходящие центральные процессоры, удостоверьтесь, что Ваш находится в этом списке.
Источник: askubuntu.ru
How to Install Drivers for Hashcat on Windows
Hashcat is a password cracking program by brute force. Hashcat runs on Windows and Linux and is very functional. This program supports many algorithms for brute force and several types of attacks, including a dictionary attack and a mask attack.
Hashcat is portable and does not require installation. But for its operation, video drivers and additional software are required. Hashcat is a command line utility, for details on how to download and run this program, see this article.
Hashcat on Windows requires the following video card drivers and software:
- AMD graphics cards on Windows require AMD Radeon Adrenalin 2020 Edition (20.2.2 or later)
- Intel CPUs require OpenCL Runtime for Intel Core and Intel Xeon Processors (16.1.1 or later)
- NVIDIA graphics cards require NVIDIA Driver (440.64 or later) and CUDA Toolkit (9.0 or later)
Thus, we will consider how to install drivers, CUDA and other software necessary for Hashcat to work. This manual is for the following configuration:
- NVIDIA graphics card
- CPU Intel
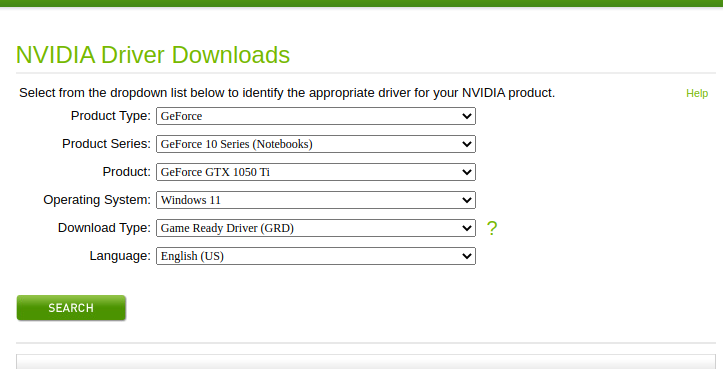
Instal NVIDIA driver
Select the version of your video card and your operating system, download and install the driver.
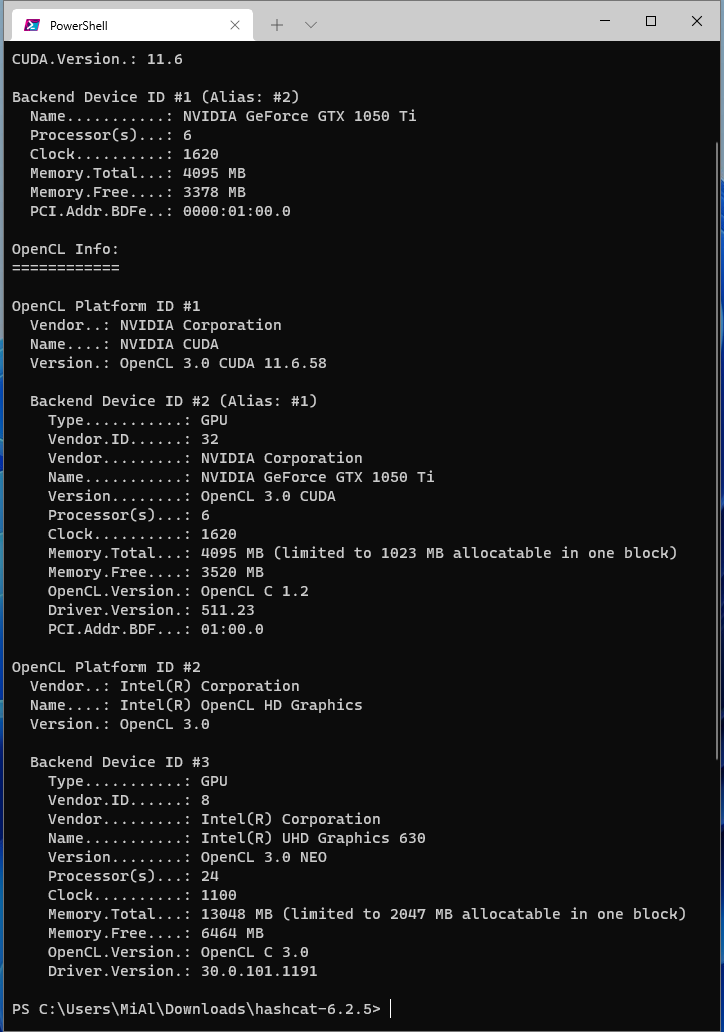
The following command can be used to check which CUDA and OpenCL devices Hashcat can see:
./hashcat -I
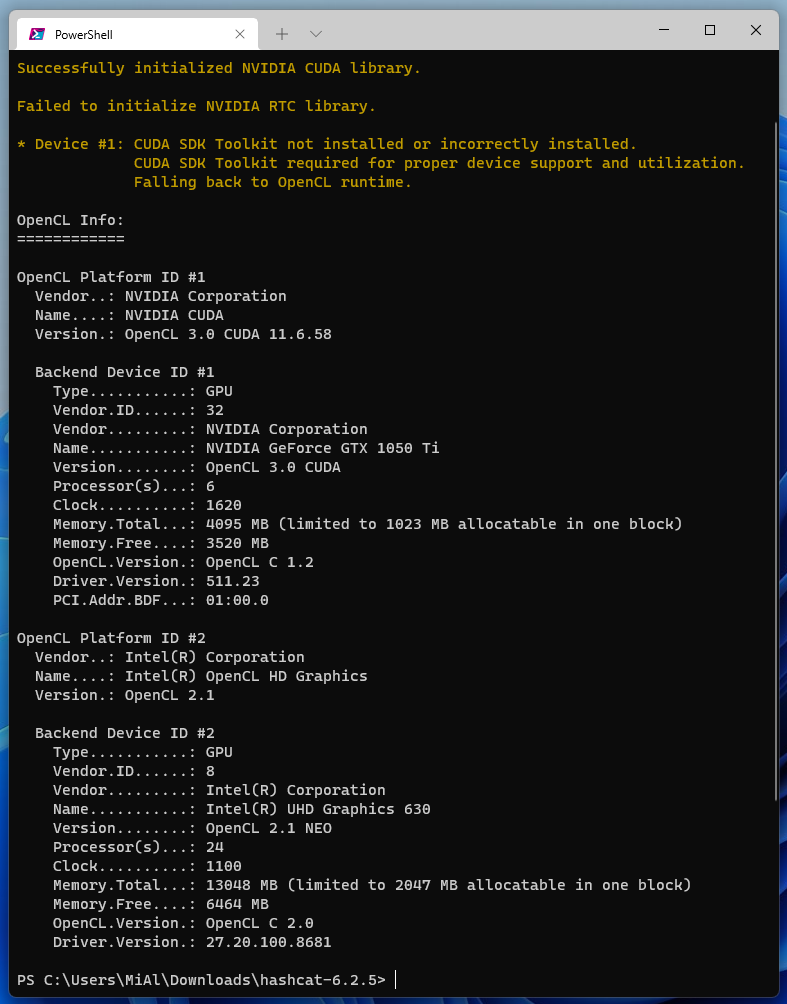
At this stage (after installing the NVIDIA video driver, before installing the CUDA toolkit), the benchmark cannot be launched, the program freezes on the message “CUDA SDK Toolkit not installed or incorrectly installed. CUDA SDK Toolkit required for proper device support and utilization. Falling back to OpenCL runtime”.
Install CUDA Toolkit
Provide your system settings:
- Operating system
- Architecture
- Version
- Installer Type: exe (local) is a file for offline installation; exe (network) is a file for installation over a network
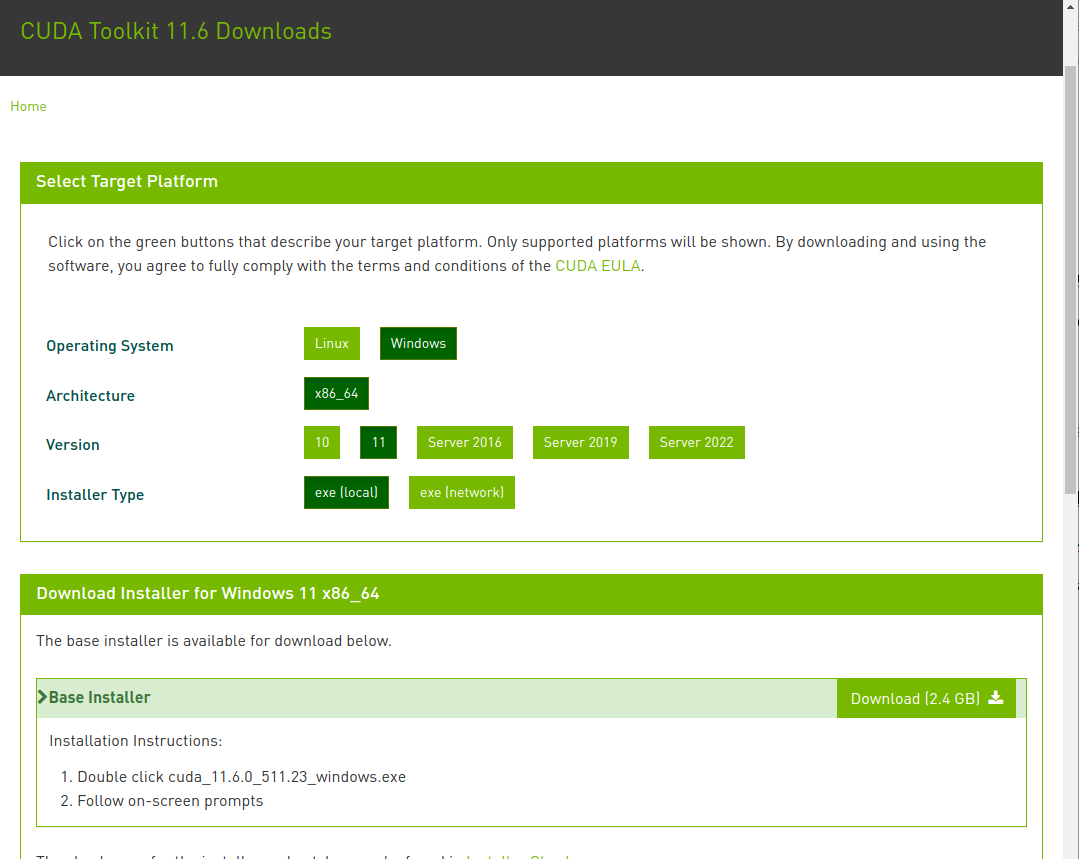
The downloaded file is over 2 gigabytes in size. Run it and follow the installer prompts.
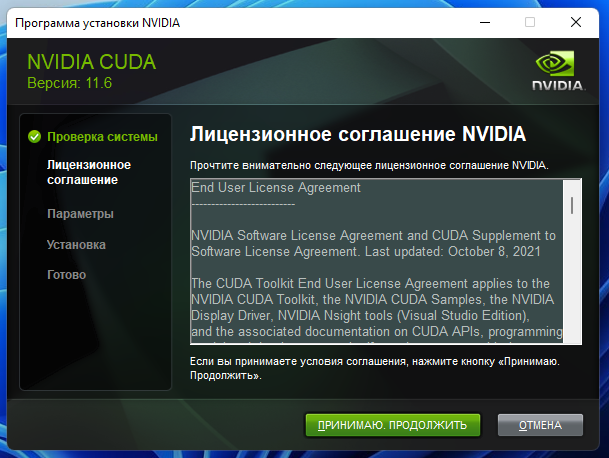

You can choose not to install GeForce Experience and other software that you do not need. If you have already installed the graphics card driver, you can choose not to install it at this stage.
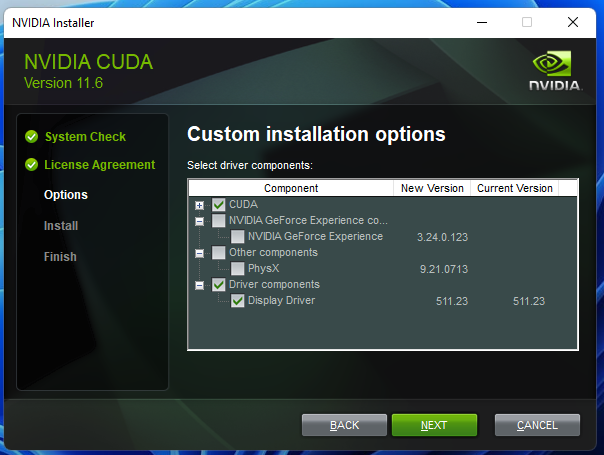
This window informs us that due to the absence of Visual Studio, the components necessary for integration with it will not be installed – this will not bother us, just check the box to continue.

After the CUDA Toolkit installation is complete, to see which devices Hashcat recognizes, enter the command:
./hashcat -I
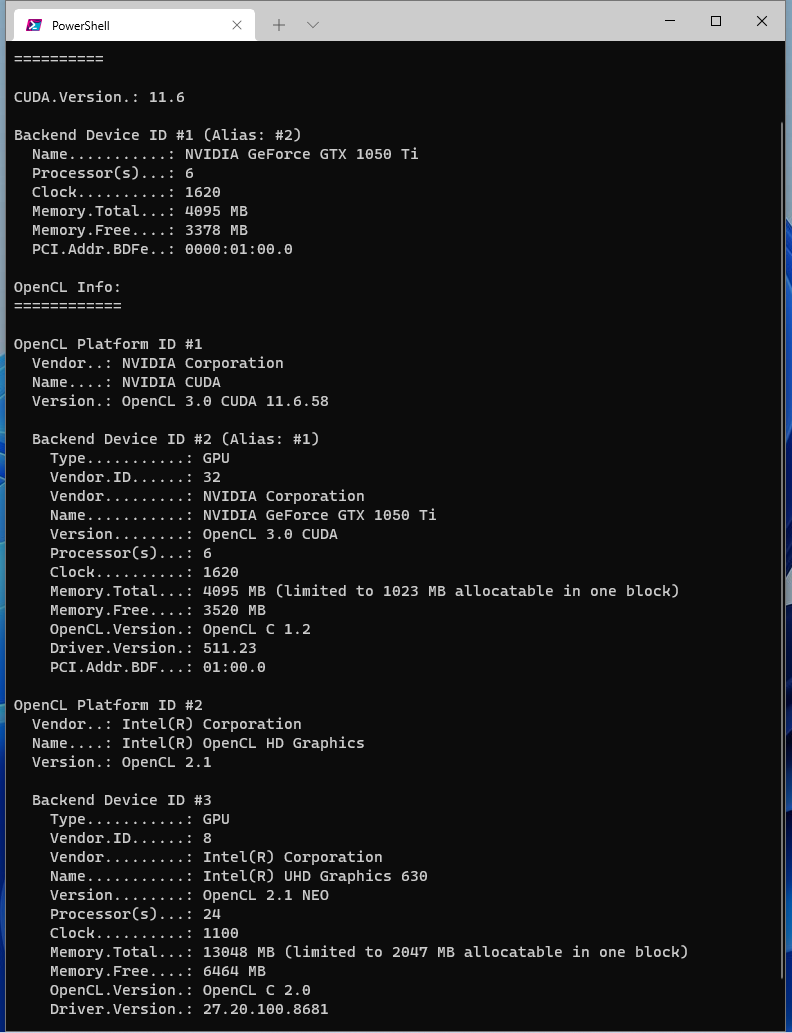
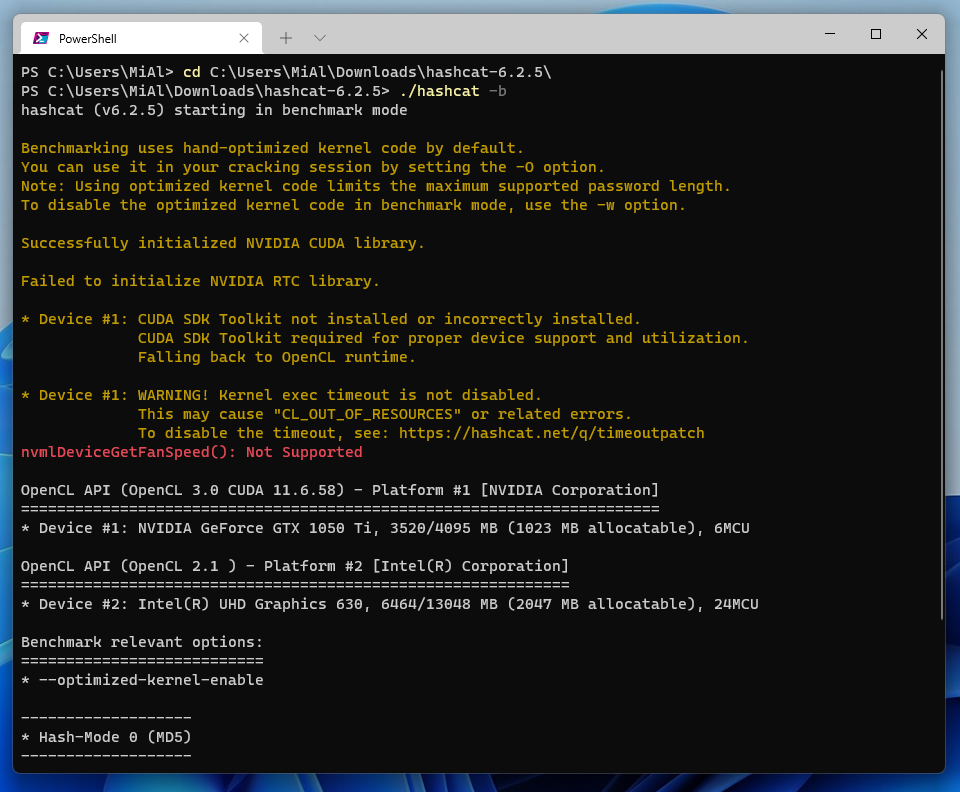
The output showed an entry for CUDA, even though the device is listed as device alias #2. Now you can run the benchmark to check the performance of Hashcat:
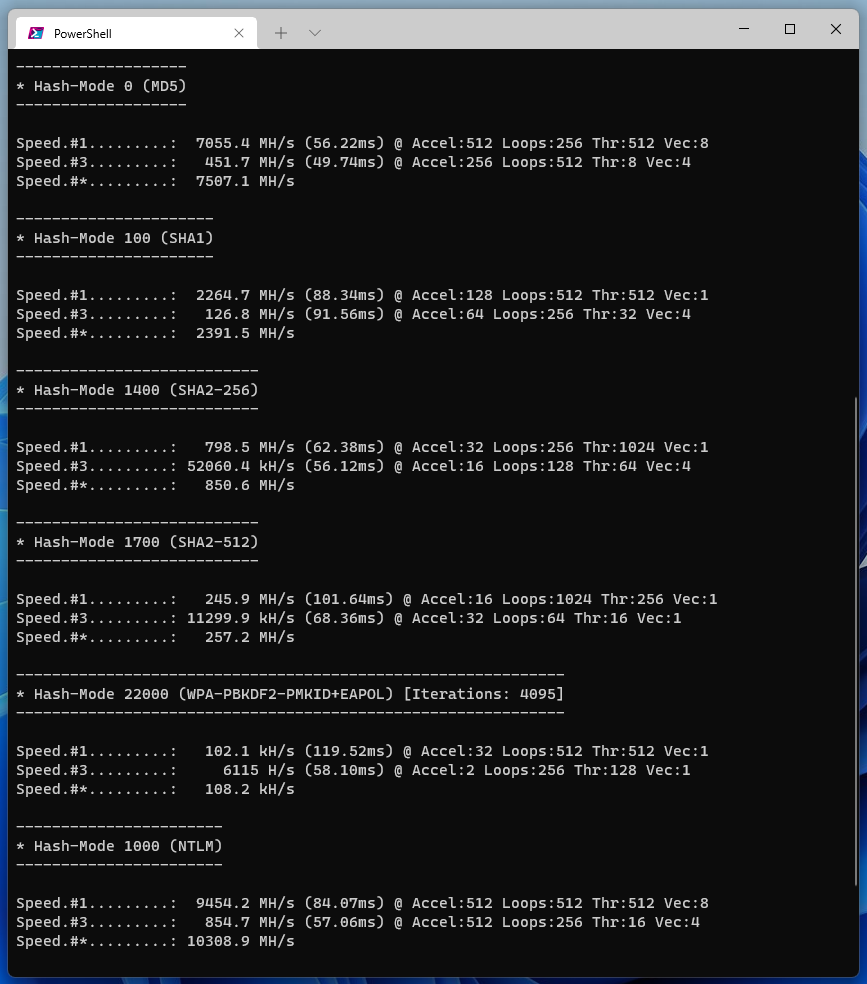
./hashcat -b
If you do not know how to work with Hashcat, then see the article for the most novice users: Hashcat manual: how to use the program for cracking passwords
Instal Intel CPU video driver
Central processes can have video cores that can also be used to crack passwords.
Windows 11 and Windows 10 operating systems can independently, without user intervention, install a driver to use the graphics core of the Intel CPU. My previous benchmark showed that the CPU is already in use.
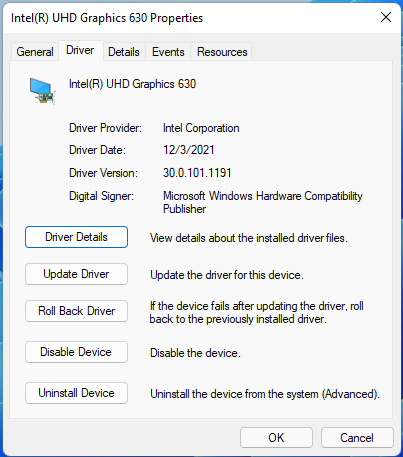
Check the driver version for Intel CPU in Device Manager:
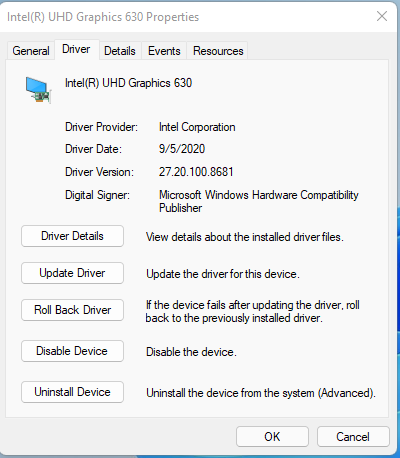
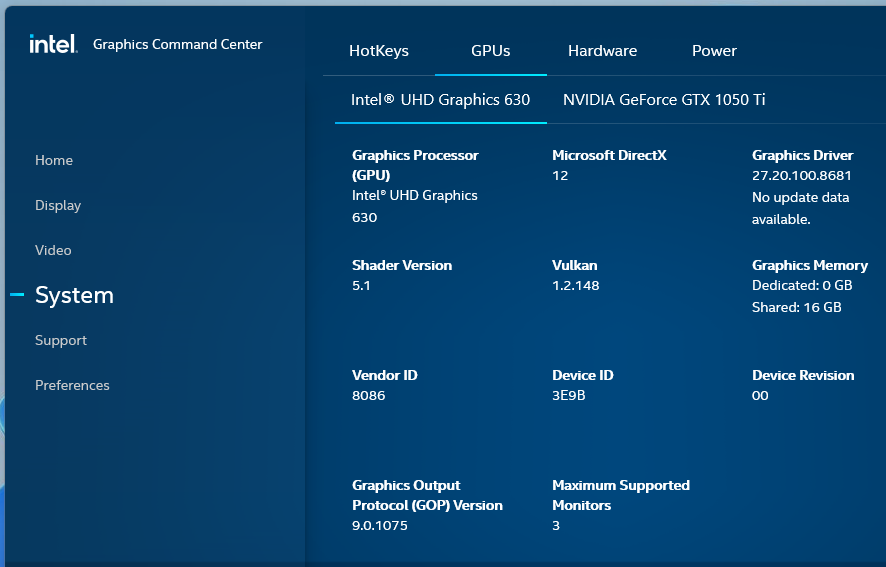
Auto installed version: 27.20.100.8681.
A program called “Intel Graphics Command Center”, which was also installed automatically, shows the same version of the driver and reports that this is the latest version.
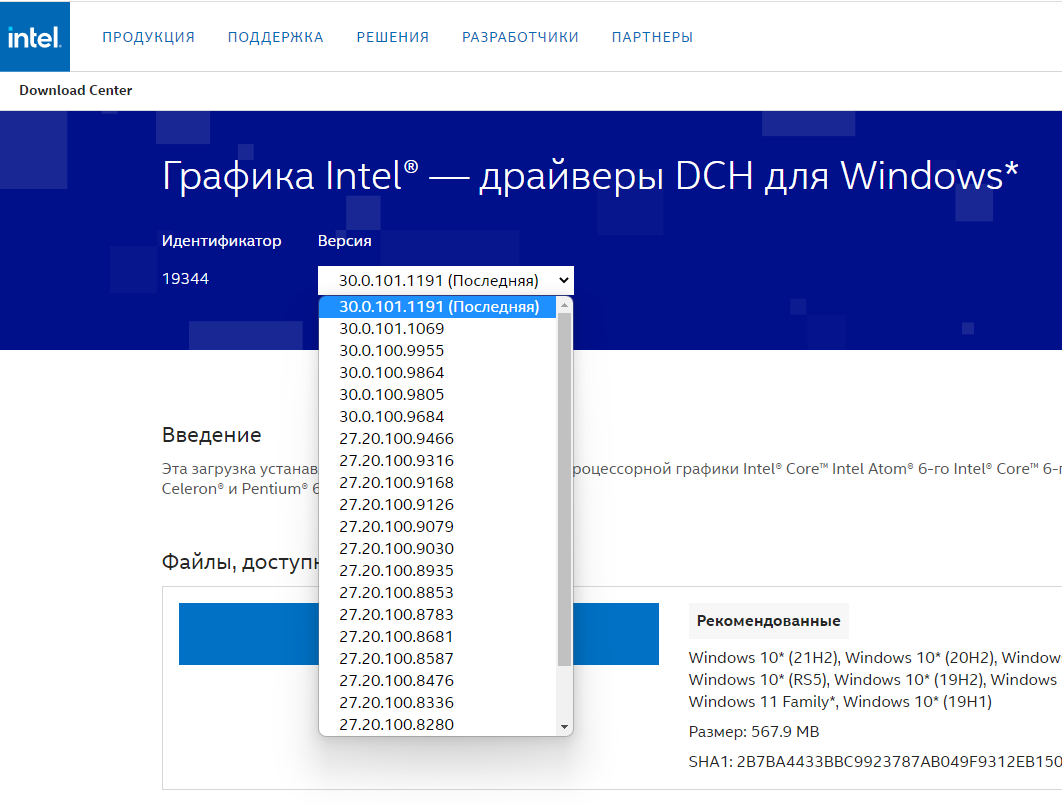
But on the page “Intel Graphics — DCH Drivers for Windows” (https://www.intel.com/content/www/us/en/download/19344/intel-graphics-windows-dch-drivers.html), at the time of writing, the latest version is 30.0.101.1191. This driver supports Intel 6th to 12th generation processors.
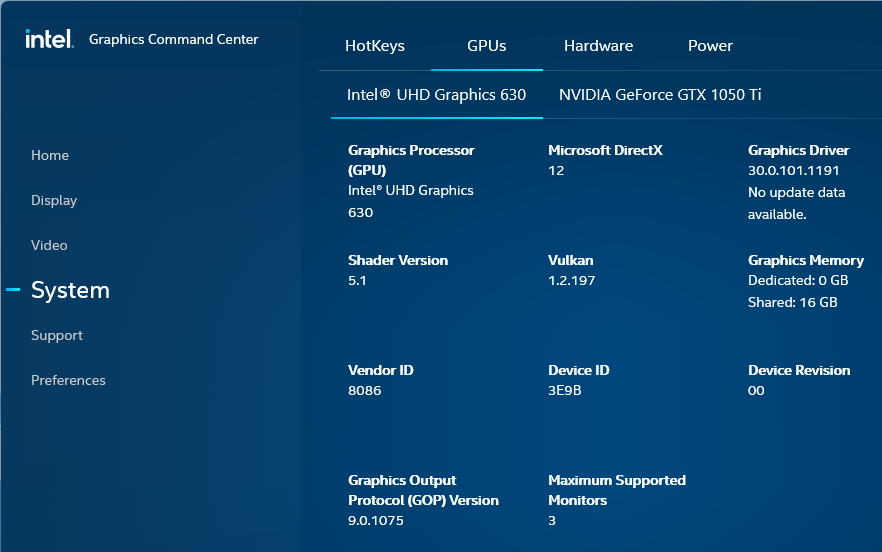
I updated this driver on my system, as you can see, the driver version is 30.0.101.1191:
Check what has changed in the list of recognized devices:
./hashcat -I
Please note that installing the updated driver raised the OpenCL CPU version from 2.1 to OpenCL 3.0.
Install OpenCL Runtime for Intel
To download the Intel® CPU Runtime for OpenCL Applications for Windows OS, go to this page: https://registrationcenter.intel.com/en/products/download/3600/ (registration required to access the file).
Please note that the last two links do not contain the latest version. The latest version can be downloaded here https://registrationcenter.intel.com/en/products/download/3600/, but I am required to update the license and I do not understand how to do this (and do not really want to if I need to pay for the license ) — if you have ideas, then write in the comments to this article.
Check what has changed in the list of recognized devices:
./hashcat -I

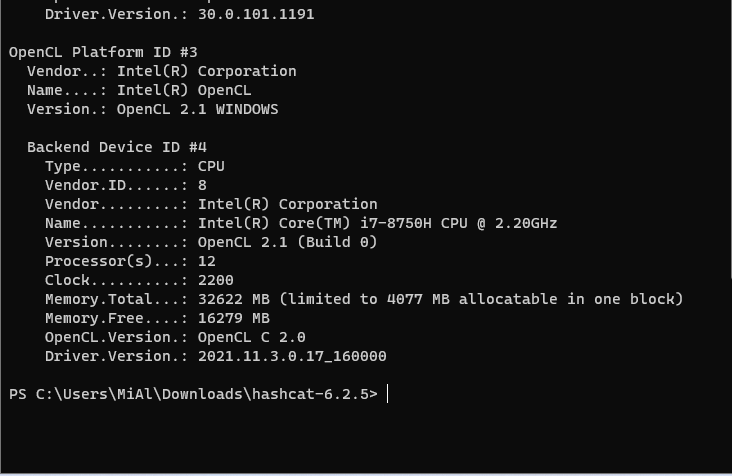
A new device has been added, unfortunately Hashcat was unable to use it in my tests, possibly because the device has OpenCL 2.1 and the Intel display driver is designed to work with OpenCL 3.0.
Error “CUDA SDK Toolkit not installed or incorrectly installed. CUDA SDK Toolkit required for proper device support and utilization. Falling back to OpenCL runtime”
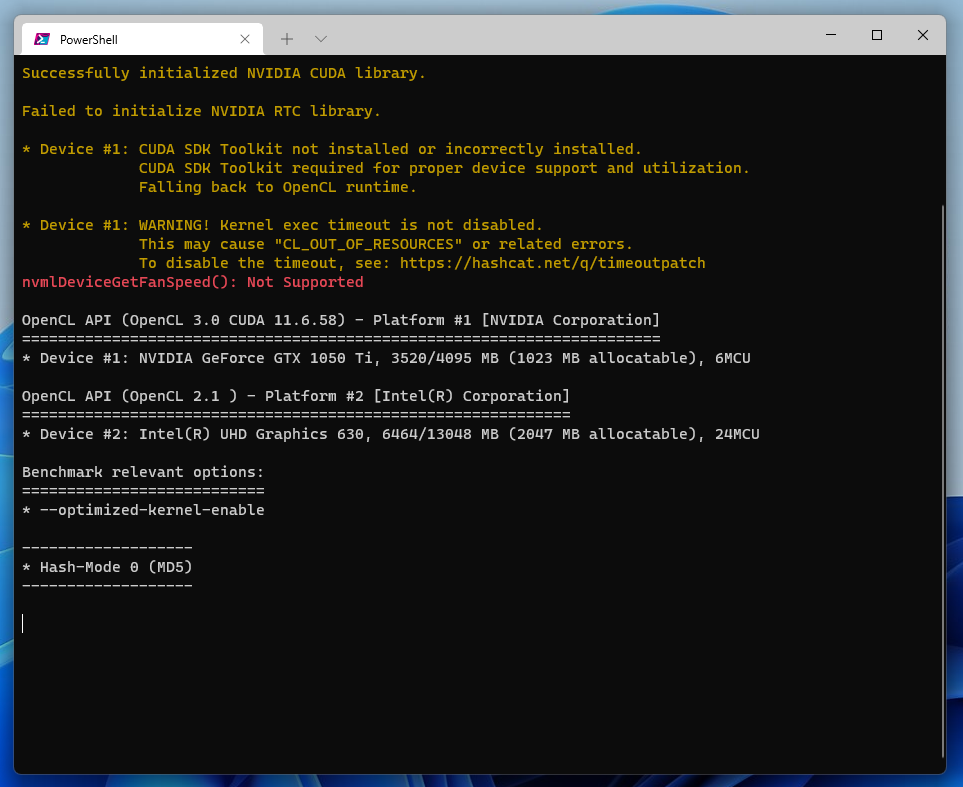
When running the benchmark, you may encounter a message:
Benchmarking uses hand-optimized kernel code by default. You can use it in your cracking session by setting the -O option. Note: Using optimized kernel code limits the maximum supported password length. To disable the optimized kernel code in benchmark mode, use the -w option. Successfully initialized NVIDIA CUDA library. Failed to initialize NVIDIA RTC library. * Device #1: CUDA SDK Toolkit not installed or incorrectly installed. CUDA SDK Toolkit required for proper device support and utilization. Falling back to OpenCL runtime. * Device #1: WARNING! Kernel exec timeout is not disabled. This may cause «CL_OUT_OF_RESOURCES» or related errors.
To disable the timeout, see: https://hashcat.net/q/timeoutpatch nvmlDeviceGetFanSpeed(): Not Supported
Nothing happens after this message and Hashcat seems to freeze.
The cause of the problem is that the NVIDIA CUDA and/or NVIDIA video driver is not installed. Install them as shown above and the problem will be solved.
See also:
- Hashcat manual: how to use the program for cracking passwords
- Lots of links to instructions in the Hashcat program card in the Kali Linux Tools Encyclopedia: https://en.kali.tools/?p=155
Источник: miloserdov.org