
В этом руководстве мы узнаем об операторе switch и его работе в программировании на C++ с помощью некоторых примеров. Оператор switch позволяет нам выполнять блок кода из множества альтернатив.
Синтаксис оператора в си++:
switch (expression) < case constant1: // code to be executed if // expression is equal to constant1; break; case constant2: // code to be executed if // expression is equal to constant2; break; . . . default: // code to be executed if // expression doesn’t match any constant >
Как работает оператор switch в C++?
Выражение оценивается один раз и сравнивается со значениями каждой метки case:
- Если есть совпадение, выполняется код после соответствующей метки. Например, если значение переменной равно constant2, код после case constant2: выполняется до тех пор, пока не встретится оператор break.
- Если совпадений нет, выполняется код после default:.
Примечание: мы можем сделать то же самое с if … else..if, однако синтаксис оператора switch проще и его гораздо легче читать и писать.
Задача1 Блок-схема с предусловием, с постусловием, программы С++ while, for, do while Таблица x, Y
Блок-схема

Пример: создание калькулятора
// Program to build a simple calculator using switch Statement #include using namespace std; int main() < char oper; float num1, num2; cout > oper; cout > num1 >> num2; switch (oper) < case ‘+’: cout return 0; >
Enter an operator (+, -, *, /): + Enter two numbers: 2.3 4.5 2.3 + 4.5 = 6.8
Enter an operator (+, -, *, /): — Enter two numbers: 2.3 4.5 2.3 — 4.5 = -2.2
Enter an operator (+, -, *, /): * Enter two numbers: 2.3 4.5 2.3 * 4.5 = 10.35
Enter an operator (+, -, *, /): / Enter two numbers: 2.3 4.5 2.3 / 4.5 = 0.511111
Enter an operator (+, -, *, /): ? Enter two numbers: 2.3 4.5 Error! The operator is not correct.
В приведенной выше программе мы используем оператор switch … case для выполнения сложения, вычитания, умножения и деления.
Указатель на структуру в C++
Как работает эта программа?
- Сначала мы предлагаем пользователю ввести желаемого оператора. Затем этот ввод сохраняется в переменной char с именем oper .
- Затем предлагаем пользователю ввести два числа, которые хранятся в num1 и num2.
- Затем оператор switch используется для проверки оператора, введенного пользователем:
- Если пользователь вводит +, числа производятся сложением.
- Если пользователь вводит -, выполняется вычитание чисел.
- Если пользователь вводит *, числа производятся умножением.
- Если пользователь вводит /, выполняется деление по числам.
- Если пользователь вводит любой другой символ, печатается код по умолчанию.
Обратите внимание, что оператор break используется внутри каждого блока case. Если оператор break не используется, выполняются все варианты после правильного.
- Цикл for в C++
- Преобразование типов в C++
- Оператор if … else в C++
Источник: calmsen.ru
Язык Си. #052. Выполнение программы блок схема.
Оператор выбора. Блок-схема.Синтаксис на языке паскаль.
Оператор выбора Паскаля позволяет выбрать одно из нескольких возможных продолжений программы. Параметром, по которому осуществляется выбор, служит ключ выбора – выражение любого порядкового типа.
Структура оператора выбора в Паскале такова:
Здесь case, of, else, end – зарезервированные слова (случай, из, иначе, конец);
— произвольные операторы Паскаля.
Оператор выбора Паскаля работает следующим образом. Вначале вычисляется значение выражения , а затем в последовательности отыскивается константа, равная вычисленному значению. Выполняется оператор, который следует за найденной константой, после чего оператор выбора завершает работу. Если в списке выбора не будет найдена константа, соответствующая вычисленному значению ключа выбора, управление передается операторам, стоящим за словом else. Часть else можно опустить, тогда при отсутствии в списке выбора нужной константы не будет выполнено никаких действий, и оператор выбора просто завершит свою работу.
Например, составим программу, которая по номеру дня недели выводит на экран его название:
Пример программы с использованием Case of
Program dni_nedeli; Var n: byte; Begin Readln(n); Case n of 1: writeln(‘понедельник ’); 2: writeln(‘вторник ’); 3: writeln(‘среда ’); 4: writeln(‘четверг ’); 5: writeln(‘пятница ’); 6: writeln(‘суббота ’); 7: writeln(‘воскресенье’); else writeln(‘дня недели с номером’, n,’нет’); end; end.
Следует помнить, что все константы из списка выбора должны быть различны.
Любому из операторов списка выбора может предшествовать не одна, а несколько констант выбора, разделенных запятыми. Например, следующая программа при вводе одного из символов ‘ y’ или ‘ Y’ выведет на экран «Да», а при вводе ‘ n’ или ‘ N’ – слово «Нет».
Пример программы с использованием Case of с несколькими переменными
Var ch: char; Begin Readln(ch); Case ch of N, n: writeln(‘Да ’); Y, y: writeln(‘Нет ’); End; End.
Очевидно, что рассмотренные выше программы можно записать с помощью вложенных или последовательно расположенных условных операторов, но в подобных задачах использование оператора выбора является более простым. Основное отличие условного оператора от оператора выбора состоит в том, что в условном операторе условия проверяются одно за другим, а в операторе выбора значение ключа выбора непосредственно определяет одну из возможностей.
Составной оператор.Синтаксис на языке паскаль.Особенности применения.
Составной оператор: если при некотором условии надо выполнить определенную последовательность операторов, то их объединяют в один составной оператор. Составной оператор начинается ключевым словом BEGIN и заканчивается словом END. Между этими словами помещаются составляющие операторы, которые выполняются в порядке их следования. После END ставится точка с запятой, а после BEGIN — только пробелы.
Замечение редактора: составной оператор можно использовать не только внутри условного оператора, после BEGIN тоже можно ставить ;, хотя это и не принято, после END ; может и не ставится. Такое происходит, например, в случае наличия ещё одного END сразу после него.
Слова BEGIN и END играют роль операторных скобок. Тело самой программы также имеет вид составного оператора. После последнего END ставится точка. Нельзя извне составного оператора передавать управление внутрь его.
Примечание редактора: имеется в виду неизучаемый нами оператор GOTO (безусловного перехода).
ОПЕРАТОР ЦИКЛА С ЗАДАННЫМ ЧИСЛОМ ПОВТОРЕНИЯ.БЛОК-СХЕМА.СИНТАКСИС НА ЯЗЫКЕ ПАСКАЛЬ.
На языке Паскаль повторение некоторой последовательности действий известное число раз выполняет оператор for. Подсчет количества выполняемых действий осуществляется при помощи специальной переменной — счетчика. Поэтому цикл for называют иногда циклом со счетчиком. Цикл for на Паскале может быть представлен в двух формах.
Оператор for с последовательным увеличением счетчика
Пример 6.1. Вывод на экран квадратов чисел от 1 до 10
Program Test1; var N: integer; begin for N:=l to 10 do writeln(sqr(N)); readln end.
Поясним пример 6.1. Переменная N является счетчиком цикла. Счетчик цикла всегда должен иметь порядковый тип (то есть он не может иметь тип real). В операторе for указаны его начальное и конечное значения. Начальное значение не обязательно равно 1! При первом выполнении тела цикла N = 1, при втором — N = 2, и т. д. При последнем выполнении тела цикла N = 10.
Каждый раз перед выполнением тела цикла текущее значение N сравнивается с конечным. После каждого выполнения тела цикла переменная N увеличивается на 1.
Рис. 6.1. Блок-схема организации цикла в примере 6.1
Как только N превысит конечное значение, выполнение цикла прекращается. Считается, что после окончания цикла переменная цикла не определена (то есть в разных реализациях языка Паскаль она может принимать разные значения). Иными словами, неправильно считать, что после окончания цикла переменная-счетчик цикла имеет какое-то определенное значение. Крайне не рекомендуется внутри цикла самостоятельно менять счетчик цикла, особенно в сторону уменьшения. Это может привести к «зацикливанию» программы (бесконечному повторению тела цикла).
Оператор for с последовательным уменьшением счетчика
Счетчик может изменяться с шагом -1. Это вторая форма оператора for (for. downto . do).
Пример 6.2. Вывод на экран кубов чисел от 11 до 5
Применение циклов со счетчиком
Можно организовать выполнение одного цикла внутри другого. В этом случае различают внешний и внутренний циклы — например, когда при каждом значении счетчика внешнего цикла нужно несколько раз выполнить какое-то действие (внутренний цикл). Счетчик внешнего цикла изменяется медленнее, чем счетчик внутреннего.
Цикл в цикле Рассмотрим задачу вывода последовательности пар чисел:
11 12 13 14 21 22 23 24 31 32 33 34
Блок-схема алгоритма решения задачи показана на рис. 6.2.
Рис. 6.2. Блок-схема алгоритма с вложенными циклами, выводящего последовательность из примера 6.2
Пример 6.3. Использование цикла в цикле
Для каждого значения переменной К переменная М меняется от 1 до 4. Нетрудно подсчитать, что в этом случае оператор writeln выполнится 12 раз.
Источник: studfile.net
Simple Guide on Creating Flowchart for Switch Statement
Creating flowchart for switch statement is a good way for software engineers to improve clarity and offer the potential for faster execution.
Switch statement is one of computer programming languages, which means a type of selection control mechanism used to allow the value of a variable or expression to change the control flow of program execution via a multiway branch. It is easy to understand, read, maintain and verify that all values are handled. There are two main variants of switch statements, the first one is a structured switch, which takes exactly one branch, and the second one is an unstructured switch which functions as a type of goto.
It allows testing a variable against a list of values to change the control flow of program execution via a search and map. Switch statements work similarly to the ‘if’ statement used in high-level programming languages.
Flowchart is a formalized graphic representation of a logic sequence, workflow or manufacturing process, or similar formalized structure.
Part 2: Syntax and Working of Switch Statement
Given here is the syntax of the switch statement. The variables are evaluated and compared with several integral values. With reference to this, let’s learn the working of a switch case statement.
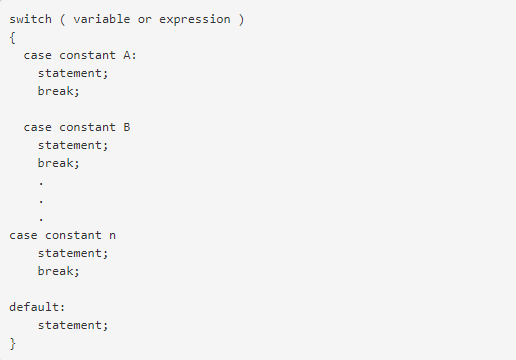
- The switch variable or expression can be defined as an integral/enumerated or class type.
- There can be multiple case statements within a switch called a block. Each case is then followed by different case labels that always end with a colon (:).
- The value A, B, and n are case labels that are used for identifying each case individually. Be sure that none of the case labels is the same and each is named according to the preference of execution. For example, two cases have been labeled X. When executing the program, the label that appears first will be executed first even if you want to execute a second case. This can change the output of the entire program and fail to produce the desired result.
- If the case label being switched on is equivalent to the variable, the case statements execute until a break statement is reached.
- The ‘Break’ keyword marks the end of a certain case. The flow of control now jumps to the next line of the switch statement. If the ‘break’ is not added in a case, the flow of control will not terminate and continue to execute all the cases.
- The default case is optional and appears at the end of the switch. If the value of a test expression is not true for any case, the default case is executed. No ‘break’ is needed for the default case.
EdrawMax
All-in-One Diagram Software
Create more than 280 types of diagrams effortlessly
Start diagramming with various templates and symbols easily
- Superior file compatibility: Import and export drawings to various file formats, such as Visio
- Cross-platform supported (Windows, Mac, Linux, Web)
Security Verified | Switch to Mac >>
Security Verified | Switch to Linux >>
Security Verified | Switch to Windows >>
Part 3: How to Make a Flowchart for Switch Statement Effortlessly?
More and more people choose Edraw flowchart maker to create their flowcharts for following incomparable advantages of it.
- A mass of various standard flowchart symbols is provided for free drag-and-drop.
- Abundant templates are offered for users to download, edit and print for free.
- A smart drawing guide enables users to connect, align and space symbols automatically instead of doing that one by one by yourselves.
- It supports inserting hyperlinks, attachments and notes to flowchart, which can make flowchart more resourceful and attractive.
Step 2: Navigate to [New]>[Flowchart]>[Basic Flowchart]
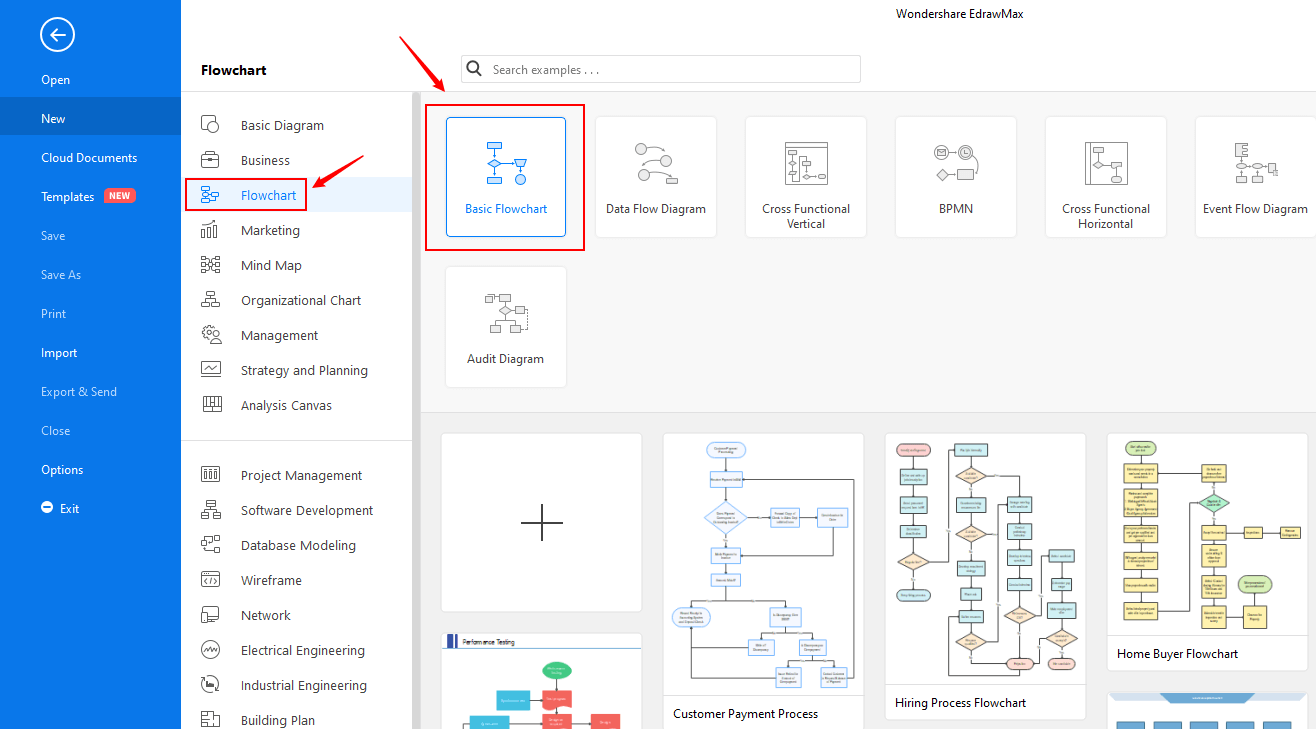
Step 3: Select one basic flowchart template to edit on it or click the [+] sign to start from scratch. Also, you can use massive flowchart symbols and elements from libraries in left menu to customize your diagram. Double click the symbols and text the key words, then click any blank area on the page to finish typing. Besides, EdrawMax provides many built-in themes which enables you to change the current theme if you do not like it.

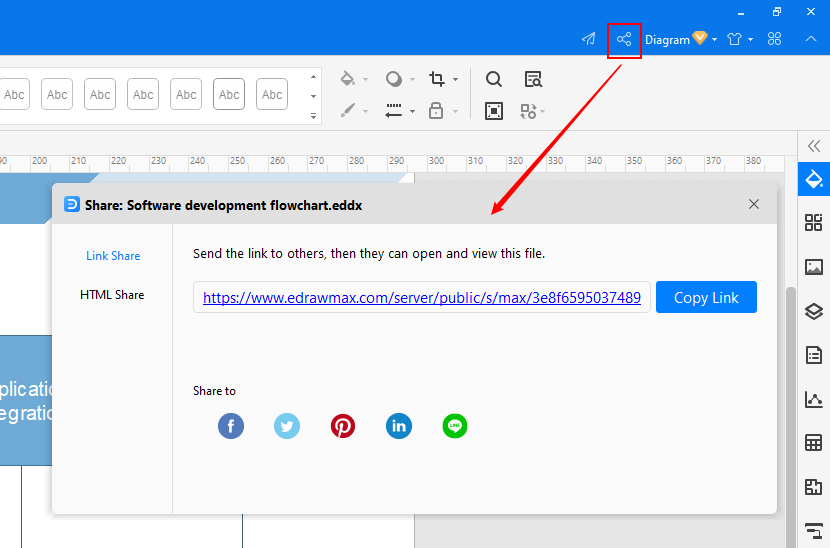
Step 4: Once finished your creation, you can export the file in multiple formats, including Graphics, PDF, editable MS Office file, SVG and Visio vsdx file.

Step 5: Besides, you can share your diagram with others via social media and web page. Or publish your diagram in EdrawMax template gallery to show your work with others.
Part 4: Flowchart for Switch Statement Examples
Flowchart for Switch Statement Example

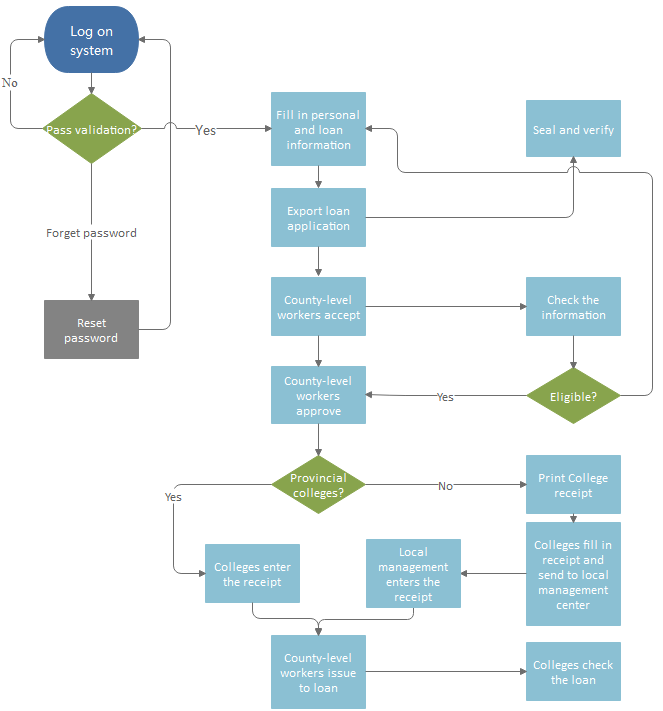
Flowchart for Loan Management
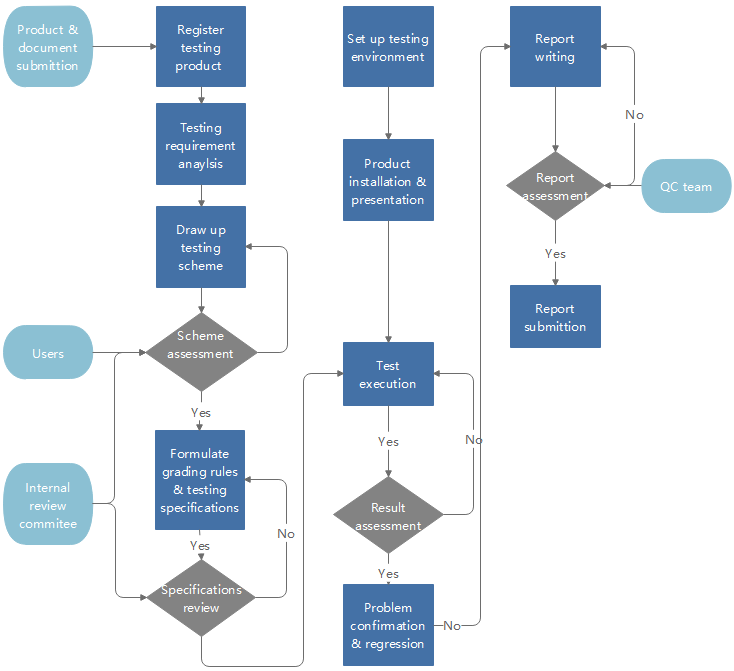
Product Development Flowchart
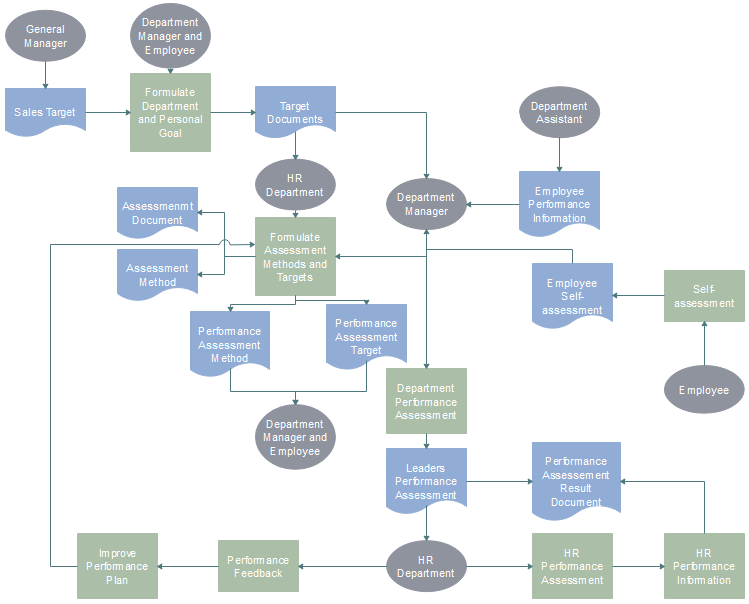
Employee Performance Evaluation Flowchart
Part 5: Switch Case Flowchart
Here is a switch case flow chart that shows how a case is selected for a switch case.
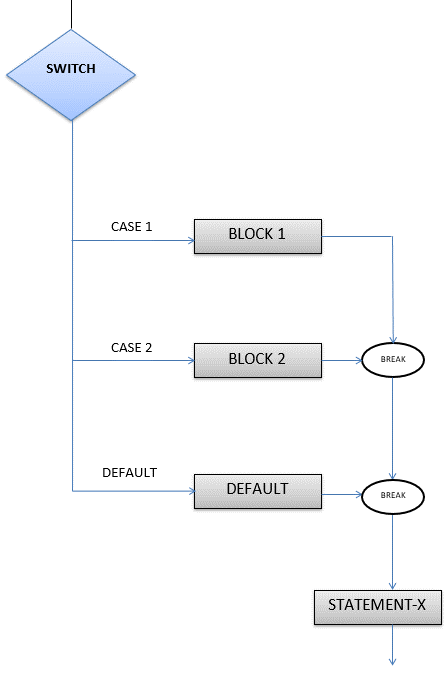
When the switch is turned on, the expression/variable specified in the switch statement is evaluated and compared, one by one, to the values of each case label. If both the values are equivalent, the block corresponding to that label is executed, until a break statement occurs. If none of the values match the expression, the default is switched on. Once the switch is executed, the control flows to statement X and the program execution continues.
Part 6: Switch Case Example in C


In the program above, the variable specified in the switch is 8. A switch statement compares the value with the constants of different case labels to execute the case statements if they match. In this program, when the switch is turned on, the value is evaluated and compared. Since the case label with value 8 matches our specified variable, the corresponding block will be executed. The matched case has a break statement after the block; hence, the next cases will be skipped, and the program is terminated. The output value is then printed.
Part 7: Why Do We Need a Switch Statement?
Switch statements are primarily used for improving clarity. The ‘if’ statements increase the complexity of a program whenever an alternative route arises. If there are multiple ‘if’ statements in a program, it becomes difficult to understand and comprehend the program.
For this reason, switch statements are introduced in a program. They make the program more comprehensible by reducing repetitive coding. In addition, they also offer faster and efficient execution through optimized compilation.
Rules for A Switch Statement:
- For a switch, one case per execution is selected.
- The expression should always execute an output.
- Value for case label and the switch variable should be of the same data type (integral or character).
- The value of the case should not be variable.
- Case labels must always end with a colon (:).
- The default label is optional. If present, there can only be one label in the entire program.
Part 8: Creating Switch Case Flowcharts with EdrawMax
Creating switch case flowcharts seems arduous but it’s a piece of cake if you have user-friendly software like Wondershare EdrawMax at your service. With abundant templates and a huge industry-grade symbol library, designing a flowchart for your program is super easy.
Just open the EdrawMax, and select Flowcharts to open a variety of flowcharts. You can also find abundant templates for switch case flowcharts that can help you create the most stunning switch case statement charts in just a few clicks. With a gamut of editing tools and a wide range of highly customizable symbols, the flowcharts are super easy to create and customize according to your needs.
Whether you want to create a flowchart or another type of graphic illustration, EdrawMax is truly a convenience. The interface is user-friendly, allowing the newbies and tech-savvy to work alike. By offering such a wide range of editing tools it helps in making the diagrams more appealing. So, download the Wondershare EdrawMax and get innovative with your illustrations.
Click flowchart examples to view and download more examples for free!
Get Started! You Will Love This Easy-To-Use Diagram Software
EdrawMax is an advanced all-in-one diagramming tool for creating professional flowcharts, org charts, mind maps, network diagrams, UML diagrams, floor plans, electrical diagrams, science illustrations, and more. Just try it, you will love it!
Источник: www.edrawsoft.com